Sunday, February 2, 2014

Snow dyed fabric


It snowed this week so I got to try the snow dyed fabric technique I've been reading about. My friend and fabric artist, Pat Cafferty from Canada, has done some beautiful snow dyed fabric and has encouraged and inspired me to try this. I have much to learn yet, but the completed dyed fabric is interesting and should lend itself to being the background to some of my Spirit paintings. Here is the documentation of the steps I took to dye the fabric with snow. 


Soda Ash soak for 10 min. to help the fabric accept and hold the dye.  Make sure you wear protective goggles and mask.

The large pans I used held cookie cooling racks in the bottom.  These helped keep the cloth off of the bottom of the pan so it didn't sit in a pool of dye after the snow melted.

These two smaller pans are about shoe box size.  The cloth was placed in the bottom of the pans with no rack to hold the fabric up.

This is the cloth scrunched in the large pan lying on top of the cookie rack.

This photo shows the cloth in the small pan, with the cloth sitting on the bottom of the pan.

This is the first large pan with the snow filled to the top.  Approximately 1/2 teaspoon of powdered RIT fabric dye was randomly sprinkled over the top of the snow.  I used Royal blue, red and fuchsia dye.

This is the completed, dried and ironed full piece of course muslin fabric that I used in this first pan.   

Detail of the muslin fabric.

Second detail of the muslin fabric.

Third detail of the muslin fabric.

Fourth detail of the muslin fabric.

This is the second large pan with the snow filled to the top of the pan.  The colors used here were orange, fuchsia, and red.  The very dark areas are the red powdered dye.  I used approximately 1/2 teaspoon of each color.

This is 100% fine cotton fabric that measures approximately 36"x45".  It is completed, dried and ironed.  The texture in the dye patterns is much more subtle than the courser fabrics.

Detail of fine cotton fabric.

Detail 2 of fine cotton fabric.

Detail 3 of fine cotton fabric (this photo came out a little brighter than the actual fabric.  This piece is actually very soft colors rather than so intense.).

Detail 4 of fine cotton fabric.

Snow filled small pan with orange and fuchsia dye on top, approximately 1/2 teaspoon of each.

Full completed, dried and ironed canvas approximately 18"x36".  This piece is more vibrant than the colors appear in the photos.  The canvas seemed to accept the textured patterns better than the finer fabrics.

Detail 1 of canvas.

Detail 2 of canvas.

Detail 3 of canvas.

This is the second small pan filled with snow and approximately 1/2 teaspoon of fuchsia and royal blue dye with the second piece of canvas fabric in the bottom.

This is the full 18"x36" piece of canvas, dried and ironed.  It is my favorite piece.  It had more white in it than I thought it would, since it sat on the bottom of the small pan with no rack to keep it up out of the melted liquid dye.  I love the patterns and textures in this one, as well as the colors.  I felt this was the most successful piece.  I may just stretch and frame this piece without painting anything on top of it.  

Detail of blue canvas.

Detail 2 of blue canvas.

Detail 3 of blue canvas.

Please watch for further posts of these pieces as I use them for a base for my Spirit paintings.  I hope you enjoyed this post.  Please feel free to leave a comment or contact me on Facebook.


Saturday, January 18, 2014

Wabi-sabi photos

I wanted to share some photos I took this summer, August, 2013, that, hopefully, will inspire some new paintings.  I purchased the book Wabi-sabi Art Workshop by Serena Barton this summer and the philosophy behind this book is to take time to look at our surroundings and notice the humble portions of the scene.  In other words, instead of looking at an interesting old weathered barn, look at the actual weathered wood and notice the intricate details within that small portion of the wood. 

Since one of my trips included a visit to my sister in California, I thought I would take some photos of her beautiful garden (she has 10 green fingers!) and try to zoom in on individual flowers rather than taking photos of her whole garden.  The following photos are the product of that day's journey through her special garden and retreat. When looking at the photos, try to observe the areas of color, light and shadow, patterns, textures, as well as the gorgeous blooms she is able to grow.  These photos will be used to experiment with those more abstract qualities rather than trying to paint the actual flowers.  It will be interesting to see what comes from these possibilities!  For now, I hope you enjoy the photos.  And watch for the experimental paintings that follow.


Notice the contrasts between the delicate spikes against the course texture of the ground; the spot of the hot pink dried petal against the freshness of the white bloom.  This was one of my favorite flowers.  I may use this for the first experiment.  

I like the harsh angles of the Bird of Paradise against the natural form of the dark green tree tops and bright blue sky.

The shadows look so delicate and lacy compared to the actual flower and leaves.

The large leaves, the spacing, and the color variations in the sun and shadow caught my attention.  I also like the contrast the geometry of the brick background creates against the sporadic spacing of the leaves and the wonderful pop of blue violet of the flowers.

I loved the lacy petals of this bloom.  But what really caught my attention was the colors of the dappled background!

Once I started looking more closely at individual areas, I was fascinated by the courseness of the ground texture, especially against the extremely delicate light blue flowers.  It makes the tiny flowers look so innocent and pure. 

The bougainvillea plant has always been a favorite of mine. I loved how brilliant the color was in the sunshine, how MANY colors of pink there were and the blue sky peeking through the bright green leaves.

I really like the contrast of the gorgeous petals in hot pink to white pink to DEEP dark burgundy against the dull burnt sienna bricks and the backdrop of rectangles.

The almost coral red fading to purple is wonderful and the tiny spikes just add a more magical feel to this bloom.  I also love the negative space of this bloom. 

I loved the deep purple of the leaves against the raw clay pot.  With the deep, sharp shadow of the leaves and the spot of pure white, this tiny bloom captured my heart.


The thin spiky leaves going every which way created interesting line patterns against the calmness of the simple white petals.

I love the nubbins of this plant.  The texture and subtle color variations along with the high contrast of bright light and dark shadows should make an interesting composition.

This was one of my favorite flowers in my sister's magical garden.  I was fascinated by the tiny seed pods at the end of the stems.  I just love the repetitive shapes this bloom makes.

This is a photo of the FLOWER ABOVE as it looks in January when it is in bloom (I had thought it was a bloom in photo above!).  I had my sister look up this blogsite when I published it (on Jan. 18th, 2014). When she got to the above photo, she said, "Oh, you have to see it now!"  She grabbed her laptop and ran to the garden to show me how it looked.  It was so amazing, and SO different from how it looked in August that I took a photo of my laptop screen!!!!  It worked!  Isn't it beautiful?  Who would ever guess these two photos are of the exact same flower, just 4 months difference in growth!  I just had to share this with you.  Isn't technology wonderful??!!!!  


I thought the vertical direction of the actual plant was an interesting contrast to the horizontal stripes on the leaves.  I also liked the chiaroscuro, the play of light and dark, in this photo.

I loved the delicate, tiny blue blooms against the larger, heartier succulent and both in contrast to the rough background.  I also want to play with the bright small bright green leaves against the dull blue-green/gray of the succulent.


The next few photos are of some areas or subjects that I found interesting, or spoke more personally of my sister's touch to the garden.

The contrast between the rough texture of the cement against the harsh, sharp shadow was interesting to me.

Is this crazy or WHAT!  My sister found this piece of drift wood with a rock stuck in it.  I not only loved that rarity, but found the contrast between the gentle curves of the driftwood and the geometric wood background to be very interesting.....same substance, one natural and free, one forced into submission--and the stuck rock just emphasizes that concept.

My sister and I grew up on a farm in central Kansas.  Her garden gate reminded me of our barn, for some reason.  I loved the way the "X" looks against the floppy, spiky, thin leaves and how the leaves seem to softly embrace the strong sturdy gate.

These are my sister's yellow garden boots.  I loved the color contrast against the gray cement.  The simple shapes and color seem in contrast to the utilitarian use and the image of all the hard work that goes into her magical retreat.


The last two photos were taken at the beach where we spent one glorious day.  I could have taken more wabi-sabi photos that day, but I was too enthralled with the experience of being back on the beach to spend the time taking pictures!

This is FULL of contrasts!

Loved the circles in this rock and how it was buried in the sand.  REALLY wanted to bring this rock home with me!


I hope you have enjoyed taking a walk with me through my sister's garden and a peek in to how I see the world.  I really like this concept of looking closer at the world around us.  I have always tried to do that with my compositions, but the wabi-sabi seems to take me even farther into the spirit of each subject.  I think it will be interesting and fun to see how these translate into paintings.  Please feel free to offer comments or ideas, or tell me how this has inspired you to move closer to the humble things in life.
Enjoy the POSSIBILITIES!

Saturday, January 4, 2014

Mixed Media Portraits

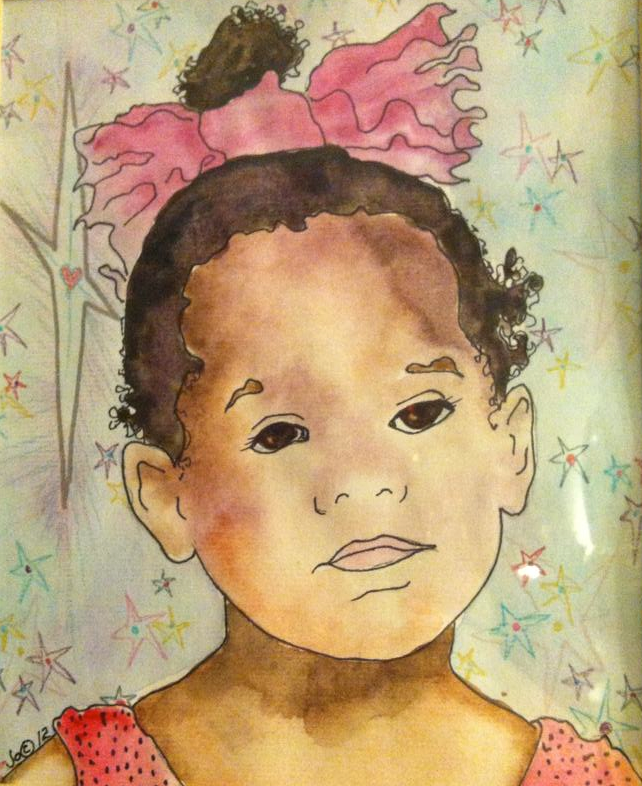
The following mixed media portraits were created between 2008 and 2009.  They are of my grandchildren and great niece and nephew.  I created seven portraits, two are unavailable for this post, that were given as gifts to the parents during a family reunion.  These are rather loose portraits that I hoped captured the personalities of the children and had a whimsical feel to them.  I have also created one of these portraits for one of my Junction City students in 2012.  


Kathryn Reilly, 2009

Maxwell Alexander, 2009

Lillee Celeste & Mom, Nicky, 2008

Reilly Josephine, 2008

Calleah Elizabeth, 2008

Commissioned piece I did for one of my CCCC students, fall, 2012--photo used with permission of Judith W.

I would be interested in painting some portraits for Valentine's day or Mother's day. 8"x10" painting, matted and framed in a solid wood frame, 11"x14". Buyer needs to provide several photos for me to work with. Mixed media--watercolor, colored pencil, ink. $50.00 plus shipping.

Thursday, December 26, 2013

Christmas, 2013

Wishing you all the merriest of Christmases and a new year blessed with God's love and light, wisdom and grace and mostly a heart filled with joy!  My gift to you is the first in my Christmas series, 'Spirit of Christmas, #1', mixed media.


Tuesday, November 19, 2013

Process of the Spirit paintings

I've been thinking that it might be interesting to track the process of putting together one of my Spirit paintings.  I usually start with the background colors.  In these next few pieces, I have already poured the backgrounds with acrylic pour paint techniques.  I add texture by spritzing a little water on the surface after I've poured some color on.  By doing this, I get both the poured paint look as well as a hint of the watercolor "rainy window" look that I love so much.  Here are a couple different background pieces.  We will see how they develop over the next few days.  I hope you enjoy the journey as much as I do.

1st piece:


This is a larger format than usual, 16"x20".  I love the rich colors and the feeling of looking through to the brighter lighter colors beyond.  I am not sure where this piece will lead me, but I can't wait to see where the journey will take me.

2nd piece:


This is the background for a piece entitled "Spirit of the Harvest Moon".  It is 11"x14".  The harvest moon is one of the special pleasures of the fall season.  It has fascinated me, delighted me, and brought out the magic of the season for me since I was a child.  The more I looked at this background, the more this seemed the perfect base for showing the spirit of this moon.

This is the preliminary sketch for the harvest moon and the figure that will represent its spirit.  I am pleased with the basic form but still pondering a few things.  One of the things I love about these Spirit paintings is how fun, playful and free the base paintings are, and how the details.....the actual spirit.....evolves over the next few days.  The process is as much fun as pouring the paint with abandon!  This is Tuesday's entry, Nov. 19, 2013.  Check back in a few days and take the journey of this process with me.

Today is Thursday, Nov. 21, 2013.  I used acrylic washes in white and orange, separately, to fill in the moon.  I used a silver metallic sharpie for the hair and then went over it with white gel pen.  I outlined the figure in white gel pen.  Then I took a little water and bit of white acrylic paint on my fingertip to rub in the skirt and create the motion of the bottom of the skirt.  

Next I added the stamp pad ink squares.  I used the bottom of an Ebony pencil dipped in yellow ochre acrylic for the cots at each corner of the square.  White gel pen made the tiny white dotted outlines on two sides of the squares.  I also used the white gel pen to outline the darker paint under the wash of the moon.  I have more to do, but once again need to sit back and look at it for awhile. 


After a couple hours of looking at this and being frustrated with how it looked, I decided to go ahead and add some more layers.  I added white colored pencil to the figure to create a dress.  I didn't think it stood out quite enough, so I added white gel pen over the colored pencil.  I also touched up the skin of her face with a light coating of off white pastel to tone the face down slightly.  I added dark burnt sienna swirls to the edge and bottom of the dress to add some contrast and bring that color to the bottom of the composition.  Then I went in around the moon to add a glow and some contrast.  I started with yellow ochre colored pencil and brought the straight lines out from the moon extending far into the composition and edges of the page.  On top of that I added some of the burnt sienna for contrast around the moon, and then for more contrast added a dark green in very short lines.  Now I will let it sit until tomorrow morning.  I think it is close to being completed, but we will see how it looks in the morning!

February 24, 2014:  After almost three MONTHS, I have finally completed this painting.  I was never satisfied with the "dress", so today I finally went back in and changed that portion of the painting.  I am pleased with the way it looks now.  It is much more in line with the "Spirit" image I had when I started the painting.  I hope you like this version and that you feel the joy and power of this Spirit.


3rd piece:

This next piece has several layers on it already.  To begin with, I scraped splattered acrylic paint across the whole page in yellows, orange and red.  There was a big puddle of paint on the table top, so I took a print of that puddle over the scraped paint.  After that dried I took bubble wrap and printed it in dark blue acrylic.  I added torn paper from my Mother's music notebook and added stamp pad ink in blue and red, then glued the paper to the painted background in three places.  I took the dark red and orange acrylic and smudged with my finger around the edges of the music paper.  Then I added orange dots with my little finger tip.  When that paint dried I added blue sharpie partial outlines to the circles, then added larger circles in blue acrylic to the whole paper.  I used the end of a cardboard roller for the smaller circles, the bottom of a plastic cup for the medium circles, and the top of the cup for the large circles.  I then took the edge of an old plastic card  and dipped it in the red paint to make the "straight" lines, not worrying if they weren't exactly straight.  I really like the way the music paper  and small orange circles work in this design.  I could think of several things to do with the design just as it is, but decided to go ahead and add more textures to see what happens.  As you can see, there are already many, many layers to this painting.


The next step was to add yellow paint to the top of the paper and spritz water under it and allow the paint to drip in the "rainy window" design down the page.  I then outlined some of the drips and textures in red sharpie marker.


I really liked the music paper with the orange small circles so I emphasized this area by adding varied lines in blue sharpie around the blue circle.  The complimentary colors of blue and orange really make this area pop.  I added the dropped petals at the bottom to emphasize the small area of textured paint.  The blue ink seemed a little stark so I softened it by adding white ink using a gel pen.  I drew right over the blue lines around the circle and then added some white ink to the petals.


I liked the white gel ink so I added a series of small white ink dots to outline the inner circle and petals.


To bring out the paint texture of the one petal, I softened the other petals with the ink from a small stamp ink pad.  At this point, I will stop and set the painting up where I can see it for a few days before deciding if it is completed or needs a little more tweaking.


Today, Wednesday, November 20, 2013, I have decided that this piece is completed.  I have titled it "Spirit of the Womb".  I hope you enjoyed watching this piece grow to completion.  May your spirit be filled with joy!